
We’ve had several viewers ask about how we make yogurt using an Instant Pot, so we decided to share a video and some information 🙂
Background:
I had wanted an Instant Pot for a while, but had no experience with pressure cookers, the old stove-top variety (except my mom’s blew one time and it scared me to death!!!), or the newer electric kind. I just knew that they were a new, popular kitchen gadget, and I love a new gadget! I did some research and discovered that some of them can make yogurt. I eat a lot of yogurt, so I thought this would be fun to try. I learned that the Lux models do NOT have a built-in yogurt function, so there is only one way to make yogurt in those models, the longer, more time-consuming “boil” method. This method is cheaper – you can use regular, plain, cheap store bought milk with the boil method. And I have tried this method one time, and it came out fine. But for me, I like the ease of just dumping two ingredients in and making yogurt. This is called the Cold Start method.
So, I got a Duo Plus model with a yogurt button. I read several methods and decided to try one from a lady named Frieda who writes a blog, Frieda Loves Bread. She has an article at her blog about each method, so that’s a great place to read and learn. As I said, I have tried both methods but much prefer the easier, Cold Start method. It does cost more, but the cost is worth it to me because of how much easier it is.
For the Cold Start method, I just purchase one container of Fairlife brand milk and one small plain yogurt. I’ve tried both whole and 2% Fairlife milk, but I have not tried the fat free one yet. For the yogurt, I’ve used Fage and Chobani, and don’t really have a preference. The milk must be ultra pasteurized and the yogurt must be a new, unopened (small) container that contains live active cultures. You’ll need those fresh cultures to turn the Fairlife milk into Yogurt, using the pre-programmed Yogurt setting on the Instant Pot.
I always plan ahead for when I will make my yogurt. It is a fairly long process, but with a little planning, it works great for me. I always start mine right before bedtime, since it takes 8 hours to turn the milk into yogurt. I have tried setting mine for 9 hours, but I prefer it at the standard 8 hour setting. The next morning, I take the Instant Pot and cover it with Saran Wrap and put it in the fridge to chill for at least four hours.
It’s VERY important that you do NOT stir or mess with the yogurt in any way before it is chilled!
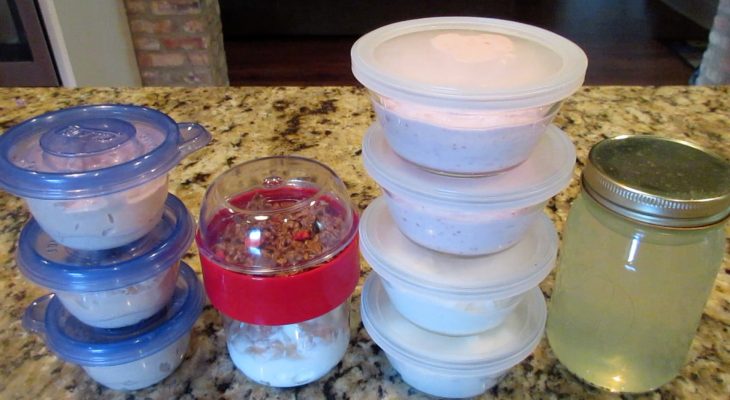
After it has chilled sufficiently, then you make a decision as to whether or not to strain it. If I just make yogurt with Fairlife milk and yogurt starter, then I always strain mine to make it thicker. The two or three times I have added the optional Nestle Simple Bliss creamer to the milk mixture (see Frieda’s blog for optional items you can add), I have found that it is thicker and either doesn’t have to be strained, or I strain it for a shorter period of time.
If I use just Fairlife milk and yogurt, I chill for 4 hours and then usually strain for about 3 to 3 1/2 hours. After that, I have a mixing bowl full of clear whey. I either pour that whey into a glass jar and store in the fridge, or else I put it in ziploc bags and store it in the freezer.
After you strain the yogurt, then you can add whatever you like to it. I often leave some plain, and then I mix with honey or stevia, some granola or fresh fruit. I like to take plain yogurt and mix with homemade jam that I’ve made in my Instant Pot (I’ve made both strawberry and blueberry, both really good mixed into yogurt).
I also take some of the plain and add 3-4 packets of Stevia and some powdered Jello Simple Goodness mixes. I usually use Strawberry and Chocolate. I also like mine with granola, so I keep some plain, and then when I’m ready to eat it, I add some local honey and some granola (my current favorite is Love Crunch Dark Chocolate with red berries, yum!).
The yogurt you make in your Instant Pot is reported to last up to two weeks in the fridge. Mine never makes it that long, I usually eat it within 6-8 days, LOL! 🙂
Also, when I open a small container of Fage or Chobani yogurt, I take the rest and freeze it in ice cube trays, then once they are frozen in blocks, I transfer them to a ziploc bag and use for future batches. Honestly, it works, but fresh always works better for me. I take out 2 cubes of frozen yogurt starter about 30 minutes before I am ready to start a batch at bedtime, and whisk it in completely into the Fairlife milk.
For the whey, I usually keep one jar in the fridge and freeze the rest. You can use this whey in a smoothie instead of milk or yogurt. Also, I like to use the whey for homemade salad dressing. I make a Homemade Ranch Seasoning Mix that I always have on hand in my refrigerator. I like to use the whey in place of buttermilk or milk, for either a regular ranch dressing, or a Mexican ranch that I like to use on taco salads or a side salad to go with a Tex-Mex meal. You can use the whey for other things such as pancakes, waffles, biscuits, bread, etc. Here’s an article I have bookmarked about uses for whey.
If you have any questions, comments or suggestions, please leave a comment below!
I hope this helps someone. I love homemade yogurt from my Instant Pot and am really glad that I got a unit that has the pre-programmed Yogurt button on it. I like knowing what goes in my food and enjoying something I’ve made at home 🙂
This helped me when I made yogurt, thanks! Can’t wait to try it again, I think it might be cheaper than buying the big tub in the store plus I know what’s in it this way.
wheres the articale for how to use the whey.
Hi Edward! The article is linked, but I didn’t have the color different, so it was hard to see. I changed the color to red, just click on the red word “article” and it will take you to the link! Hope that helps! Have a wonderful and blessed day —Stacy
https://www.theprairiehomestead.com/2011/06/16-ways-to-use-your-whey.html